
If you’re reading this, chances are you’ve hit the wall. You bought your guitar, you’ve watched a few videos, and now you’re staring at a diagram that looks less like music and more like a child’s drawing of a fence covered in dots.
Every new guitarist goes through this exact struggle. That moment when a simple chord chart—the roadmap to playing every song you love—feels like an impossible puzzle. It’s frustrating, but I promise you: it’s the last technical hurdle before the real fun begins.
What if you could look at any guitar chord chart and instantly know where to put your fingers? Imagine the power of instantly learning the chords to any song you hear. That’s the dream, and in this comprehensive guide, we’re going to make it your reality.
By the end of this article, you will know exactly how to read guitar chords diagrams, understand the logic behind them, and be ready to conquer your fretboard. Let’s turn those frustrating dots into music.
Table of Contents
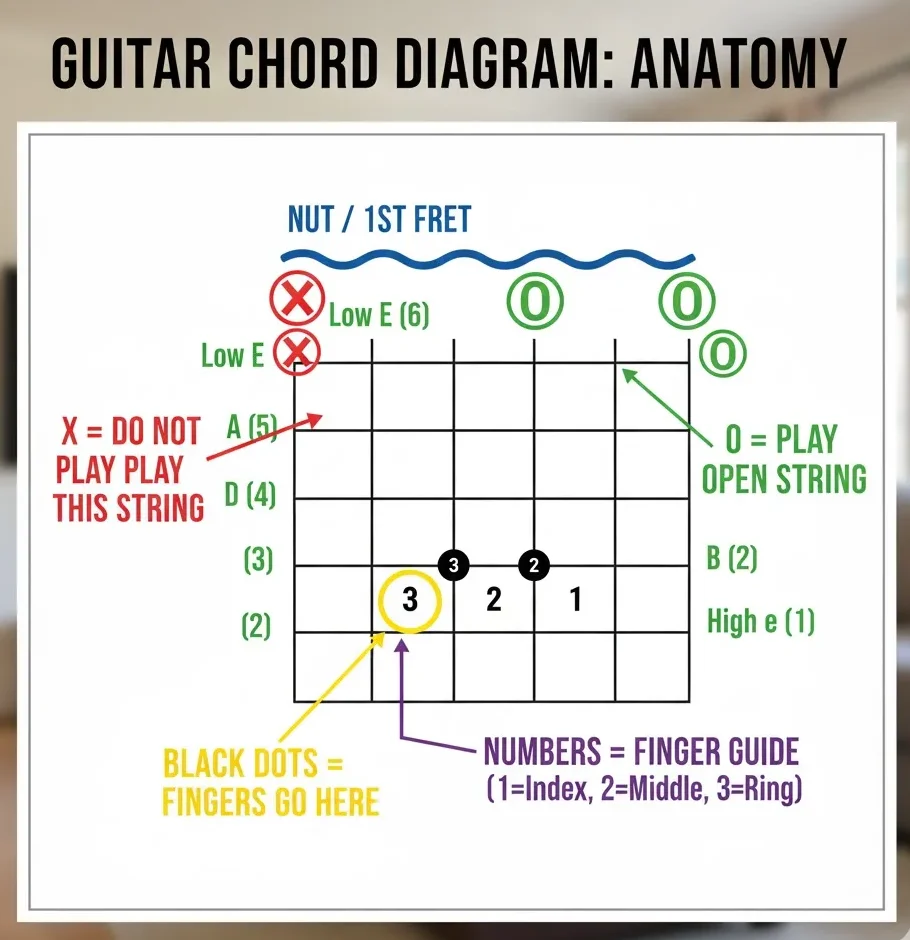
Decoding the Diagram: The Anatomy of a Guitar Chord Chart
The fundamental secret to reading guitar chords is understanding that the diagram is simply a map. It’s a literal, vertical snapshot of the guitar neck, designed to tell you exactly where your fingers belong. Once you see the connection, the confusing lines and dots snap into place.
We’re going to focus primarily on chord diagrams, as they are the fastest way to learn new shapes for accompanying songs.
The Fingerboard Map: Understanding the Grid
Look at any chord diagram. It’s a simple grid, and here is how you translate those lines into your guitar’s neck:
- Vertical Lines: These represent the six strings of your guitar.
- Horizontal Lines: These are the fret wires. The thickest line at the top of the diagram is typically the Nut (the starting point of your fretboard), or sometimes the diagram will be labeled to show the fret number (e.g., ‘Fret 3’).
Strings and Frets
The orientation is the most crucial part. Think of holding your guitar in front of you, pointing up toward the ceiling.
- The vertical line on the far left is the thickest, lowest-pitched string: Low E (6th string).
- The vertical line on the far right is the thinnest, highest-pitched string: High e (1st string).
If you can remember that simple left-to-right correlation, you’ve cracked the basic layout.
Numbers and Symbols (The Rosetta Stone)
The dots, numbers, and letters around the grid tell you precisely what action to take:
| Symbol | Meaning | Action |
| O | Open String | Play the string without pressing a fret. (The string is “open”). |
| X | Mute/Avoid | Do not strum or play this string. If you strum it, it should not ring out. |
| 1-4 | Finger Number | This tells you which finger to use. 1 = Index, 2 = Middle, 3 = Ring, 4 = Pinky. |
| Dots/Circles | Fret Location | These are your targets. Press down on the string behind the indicated fret. |
Pro Tip: Your ultimate goal is to press the dots firmly, using the tip of your finger, right behind the fret wire (not on top of it) for the clearest possible sound.
From Diagram to Fingers: Playing Your First Chords
Now for the fun part: taking the visual information and translating it into muscle memory. We’ll start with the essential building blocks—the chords that make up a massive number of popular songs.
The Essential Chord Family: G, C, D, and E Minor
These four open chords are the foundation of almost all beginner guitar songs. Let’s practice reading them:
- G Major: Requires fingers 1, 2, and 3 (or 2, 3, and 4 in some variations). Note the ‘O’s on the D, G, and B strings.
- C Major: Look for the ‘X’ on the Low E string. You must avoid hitting that 6th string, or the chord sounds muddy.
- D Major: This one uses only the thinnest four strings. The top two strings (E and A) are marked with an ‘X’.
- E Minor (Em): Simple and satisfying! Just two fingers on the A and D strings, and everything else is ‘O’ (open).
Visual Suggestion: Imagine placing individual, clear chord diagrams for G, C, D, Em right here.
Practice Drill: The Two-Chord Switch
Learning how to read guitar chords is only useful if you can switch them quickly. Your first major practice challenge is switching between two chords that share a common anchor finger.
The G $\to$ C Switch:
- Focus: Instead of lifting all your fingers, try to keep the middle finger (2) or the index finger (1) anchored or close to the board.
- Tempo: Start agonizingly slow. Use a metronome set to 60 BPM and aim to cleanly change chords on the beat. Don’t speed up until you get 10 clean switches in a row.
Your First Song: The Four-Chord Magic
Once you can read and play your first few shapes, it’s time to put them into context. Chords sound best when played in a Chord Progression.
The most famous progression in pop music uses G, D, Em, and C. It’s an easy, reliable sequence that instantly sounds like a song.
| Chord Position | Chord Name | Action (Count) |
| 1 | G Major | Strum Down-Up (1-2) |
| 2 | D Major | Strum Down-Up (3-4) |
| 3 | E Minor (Em) | Strum Down-Up (1-2) |
| 4 | C Major | Strum Down-Up (3-4) |
Exercise: Practice playing the progression G $\to$ D $\to$ Em $\to$ C four times through. Focus purely on making the transitions smooth and the sound clean. This is the fastest way to integrate the diagrams you read into your musical reality.
Advanced Diagram Reading and Common Variations
As you progress, you’ll encounter chord diagrams that don’t start right at the nut. These are usually barre chords or higher-fret variations.
Barre Chords: Mastering the ‘Barre’ Symbol
A barre chord diagram introduces a thick, curved line running horizontally across multiple strings. This line represents a barre—when one finger (almost always your index finger, Finger 1) presses down multiple strings simultaneously.
The Power of Movable Shapes
Barre chords are intimidating, but they introduce the concept of movable shapes.
- E-Shape: When you play a barre chord rooted on the Low E (6th) string, you are using the same finger pattern as an open E-chord. Move this pattern up the neck, and you change the name of the chord.
- A-Shape: When the chord is rooted on the A (5th) string, you are using the open A-chord pattern.
For example, to read an F Major barre chord, you’ll see the barre on the 1st fret (your index finger), and then the rest of your fingers form the E Major shape relative to the barre. Learning how to read barre chords charts is simply recognizing which movable pattern you are using.
Common Reading Pitfalls and Solutions
Even when you read the diagram perfectly, the sound can come out muddy or buzzy. This is a common physical issue, not a reading error.
Here is a list of common errors and how to solve them:
- The Buzzer: If a string buzzes, you are likely pressing on the fret wire itself. Solution: Shift your finger slightly back so the pressure point is right behind the fret.
- The Mute: If a string is completely silent, your finger on an adjacent string is probably drooping and touching it. Solution: Arch your fingers more steeply. Think of your fingertips as little hammers hitting the fretboard.
- Ignoring the X: Beginners often forget to check the ‘X’ strings (the ones to be muted). Solution: Before your first strum, perform a quick “string check” where you lightly pluck each string individually to ensure only the intended notes ring out.
FAQ: Your Quick Answers on Reading Chords
Here are answers to common questions about how to read guitar chords and speed up your learning process.
- How long does it take to learn how to read guitar chords? The basics of reading the diagrams—understanding the grid, the dots, and the symbols—should take less than 30 minutes. However, the time it takes to build the muscle memory and seamlessly switch between those chord shapes in real-time can take a few weeks of consistent, focused practice.
- Is it better to learn from tabs or a guitar chord chart? They serve different purposes. Tabs (tablature) are note-specific; they show you where to play individual notes for a melody or a riff. A chord chart shows you how to play a full chord shape for harmony and rhythm playing. If you want to accompany yourself singing, charts are faster and essential.
- What is the easiest way to memorize how to read guitar chords? The simplest way to internalize the shapes is to practice them in song context—use those simple G-D-Em-C progressions. You can also use mnemonics for the string names (EADGBe, e.g., Every All Day Guitar Begins early). Repetition in a fun, musical way is always the best memorization tool.
Conclusion: The Journey Has Just Begun
You’ve made it. You now understand the language of chord charts. That once-confusing grid is now a clear, usable map of your fretboard. You know what the lines mean, what the numbers mean, and how to position your hand to make music.
The hard, technical part of the learning process is truly behind you. Now, your only task is to practice. Pick up your guitar, try that G-D-Em-C progression one more time, and start applying your new knowledge to the songs you love.
If you are serious about fast-tracking your progress and want a clear, comprehensive resource that lays out every essential chord, scale, and progression you’ll ever need, check out our dedicated guide.
➡️ Take the guesswork out of your practice. Click here to explore the definitive [Guitar Chord Book] and instantly expand your playable song library!