
Remember the first time you heard your favorite song and thought, “I wish I could play that”? That dream doesn’t have to stay a dream. I still remember holding my first guitar, fingers awkwardly positioned, wondering if I’d ever make it sound like music.
But here’s the truth: learning how to play guitar chords isn’t about talent—it’s about taking that first brave step. Today, you’re taking yours, and I’m here to guide you through every strum, every callus, and every beautiful chord that will soon flow from your fingertips.
Table of Contents
Why Learning Guitar Chords is Your Gateway to Musical Freedom
You might be surprised to learn that you can play hundreds of songs with just four or five basic chords. That’s not an exaggeration—it’s the reality of how music works.
Guitar chords are the foundation of almost every song you love. Whether it’s classic rock, pop, country, or folk, the same chord progressions appear again and again. Once you master these essential shapes, you’ll unlock a world where playing along with your favorite artists becomes not just possible, but easy.
Beyond the practical benefits, playing guitar offers incredible mental health advantages. Studies show that learning an instrument reduces stress, improves memory, and boosts creativity. You’re not just learning a skill—you’re investing in yourself.
Understanding the Basics: What Are Guitar Chords?
The Anatomy of a Guitar Chord
A chord is simply multiple notes played at the same time. When you press down on certain strings at specific frets and strum, you create harmony—that rich, full sound that makes music feel complete.
There are two main types of chords you’ll encounter: major and minor. Major chords sound bright and happy, while minor chords sound sad or melancholic. Understanding this emotional difference helps you connect with the music you’re creating.
Reading Guitar Chord Diagrams
Before you can play, you need to understand chord diagrams. Think of them as a map showing exactly where your fingers should go.
The vertical lines represent your guitar strings (the thickest string on the left), and the horizontal lines represent the frets. The dots show you where to place your fingers, and numbers inside the dots tell you which finger to use (1 for index, 2 for middle, 3 for ring, 4 for pinky).
An “X” above a string means don’t play that string, while an “O” means play it open (without pressing any fret).
Essential Equipment: What You Need to Start Playing Guitar Chords
You don’t need much to get started, but having the right tools makes your learning journey smoother:
- An acoustic or electric guitar – Either works perfectly for beginners. Acoustic builds finger strength faster, while electric has softer strings that are easier on your fingers.
- Guitar picks – Medium thickness picks are ideal for beginners learning to strum chords.
- Guitar tuner – Free apps like GuitarTuna work brilliantly and keep your guitar sounding correct.
- Comfortable seating – Proper posture prevents back pain and helps you play longer.
- Optional: Capo – This handy device changes the pitch of your guitar, making certain chord shapes easier.
How to Properly Hold Your Guitar
Your posture matters more than you might think. Sit up straight with the guitar resting on your right leg (if you’re right-handed). The guitar should feel comfortable and balanced without you needing to hold it up.
Your left-hand thumb should sit behind the neck, roughly centered. Don’t let it creep over the top—this common mistake makes chord shapes harder to form and limits your finger mobility.
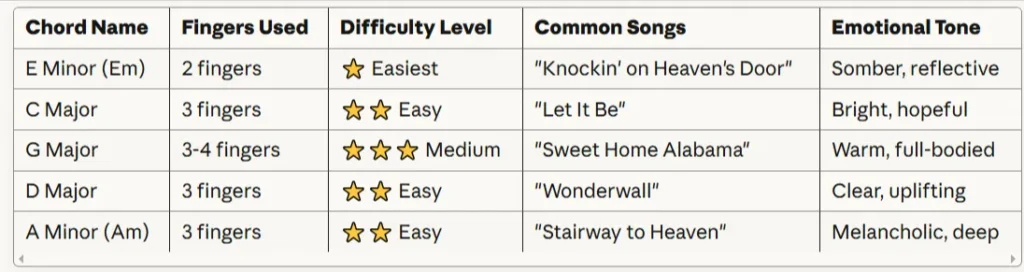
The 5 Essential Beginner Guitar Chords You Must Learn First
These five chords will unlock over a thousand songs. That’s not hype—it’s the power of mastering the fundamentals.
Chord #1 – E Minor (Em): The Easiest Chord Ever
Em is your best friend as a beginner because it only requires two fingers. Place your middle finger on the second fret of the fifth string, and your ring finger on the second fret of the fourth string. Strum all six strings.
This chord sounds contemplative and somber. You’ll hear it in classics like “Knockin’ on Heaven’s Door” by Bob Dylan.
Chord #2 – C Major: Your First Major Chord
C Major uses three fingers and creates a beautiful, bright sound. Place your ring finger on the third fret of the fifth string, your middle finger on the second fret of the fourth string, and your index finger on the first fret of the second string.
Don’t strum the sixth string (marked with an X). This chord appears in “Let It Be” by The Beatles and countless other hits.
Chord #3 – G Major: The Popular Powerhouse
G Major requires a bit more finger stretching, but it’s worth the effort. Your middle finger goes on the third fret of the sixth string, index finger on the second fret of the fifth string, and ring finger on the third fret of the first string.
This warm, full-bodied chord is everywhere in popular music, from “Sweet Home Alabama” to modern pop songs.
Chord #4 – D Major: Bright and Beautiful
D Major forms a triangle shape with your fingers. Place your index finger on the second fret of the third string, ring finger on the third fret of the second string, and middle finger on the second fret of the first string.
Only strum the top four strings for this chord. You’ll recognize it instantly from “Wonderwall” by Oasis.
Chord #5 – A Minor: Adding Emotion to Your Playing
A Minor looks similar to E Major but creates that melancholic sound that makes ballads so powerful. Put your index finger on the first fret of the second string, middle finger on the second fret of the fourth string, and ring finger on the second fret of the third string.
This chord appears in “Stairway to Heaven” and gives depth to your chord progressions.
Quick Reference Table: Your First 5 Guitar Chords
Step-by-Step Guide: How to Play Guitar Chords Cleanly
Step 1 – Tune Your Guitar Properly
Nothing sounds worse than perfectly played chords on an out-of-tune guitar. Standard tuning goes E-A-D-G-B-E from thickest to thinnest string. Use a tuner app—they’re free and accurate.
Step 2 – Position Your Fingers Correctly
Press down with your fingertips, not the flat part of your finger. Stay close to the fret wire (the metal bar) but not on top of it. Arch your fingers so they don’t accidentally touch other strings and mute them.
You only need enough pressure to make the note sound clean. Pressing harder doesn’t make it sound better—it just tires your hand faster.
Step 3 – Play Each String Individually
Before strumming the full chord, pluck each string one at a time. Every note should ring clear. If you hear buzzing or dead notes, adjust your finger position until each string sounds perfect.
This step seems tedious, but it’s the difference between sounding like a beginner and sounding like you know what you’re doing.
Step 4 – Strum the Full Chord
Once every string sounds clean, strum downward across all the strings (or only the ones marked to play). Use even pressure and let your wrist do the movement, not your whole arm.
Step 5 – Practice Chord Transitions
Real songs require moving between chords smoothly. Start by switching between two chords—Em to C is a great beginning pair. Set a timer for one minute and see how many clean changes you can make.
Look for “anchor fingers”—fingers that stay in the same position between chords. This makes transitions faster and smoother.
Common Mistakes When Learning How to Play Guitar Chords
- Pressing too hard – You’re building strength, not trying to crush the neck. Find the minimum pressure needed.
- Fingers too far from the fret – Moving closer to the fret wire makes pressing easier and sounds cleaner.
- Thumb creeping over the neck – Keep your thumb centered behind the neck for better finger reach.
- Giving up during the pain phase – Your fingertips will hurt for the first two to three weeks. This is normal and temporary. Calluses are forming.
- Skipping the individual string check – Always test each string before strumming the full chord.
- Ignoring chord transitions – Spend half your practice time moving between chords, not just forming static shapes.
Powerful Chord Progressions Every Beginner Should Know
The “Four Chord Song” Progression
The C – G – Am – F progression (or G – D – Em – C in another key) appears in thousands of hit songs. You’ll recognize it from “Let It Be,” “No Woman No Cry,” and “Someone Like You.”
Once you can play this progression smoothly, you’ve unlocked an enormous catalog of songs to learn.
The Classic Rock Progression
G – C – D is the backbone of rock and country music. Practice this progression until your fingers move automatically between these shapes. “Sweet Home Alabama” and “Knockin’ on Heaven’s Door” both use variations of this pattern.
Tips to Make Learning Guitar Chords Easier and Faster
- Practice 15-20 minutes daily instead of marathon weekend sessions. Consistency builds muscle memory.
- Start with songs you love so motivation stays high even when your fingers hurt.
- Record yourself weekly to hear your actual progress—you’re improving faster than you realize.
- Join online communities like Reddit’s r/guitarlessons for support and encouragement.
- Embrace the discomfort because everyone goes through it. Your fingertips will toughen up.
- Use a metronome to develop timing and rhythm from day one.
- Celebrate small victories because every clean chord is worth acknowledging.
Frequently Asked Questions About How to Play Guitar Chords
How long does it take to learn how to play guitar chords?
Most beginners can form basic open chords within two to four weeks of consistent practice. You’ll be playing simple songs within one to two months. However, smooth transitions and finger strength take three to six months to develop fully.
Why do my fingers hurt when playing guitar chords?
Fingertip soreness is completely normal for beginners. You’re building calluses, which typically develop within two to three weeks. Practice in shorter sessions, don’t press harder than necessary, and take breaks if the pain becomes sharp.
What is the easiest guitar chord to learn for beginners?
E Minor is universally considered the easiest because it only requires two fingers on the second fret. It’s a perfect starting point that builds confidence before moving to more complex shapes.
Can I learn how to play guitar chords without reading music?
Absolutely! Chord diagrams and tablature allow you to learn guitar without reading traditional sheet music. Millions of guitarists play solely by chord charts, tabs, and ear training.
How many guitar chords do I need to know to play songs?
You can play hundreds of popular songs with just five to seven basic open chords. Most pop, rock, and folk songs use simple progressions that beginners can master quickly.
Your Guitar Journey Starts with a Single Chord
You’ve taken the first step that separates dreamers from players. Those five chords you learned today are the same chords used in countless hit songs, played by beginners just like you who kept going.
Your fingers might be sore, your transitions might be clunky, and that’s exactly how it should be. Every master guitarist has felt what you’re feeling right now. The difference is they didn’t stop.
Pick up your guitar tomorrow, and the day after that. Because the world needs your music—even if you’re the only one who hears it at first.
Ready to accelerate your guitar journey? Download our Guitar Chord Book with detailed diagrams, practice routines, and song suggestions specifically designed for beginners. Your breakthrough moment is closer than you think—start building it today, one chord at a time.